> ## Documentation Index
> Fetch the complete documentation index at: https://x-preview-mintlify-e1ed7706.mintlify.site/llms.txt
> Use this file to discover all available pages before exploring further.
# Obtaining Access Tokens using 3-legged OAuth flow
> Walk through the 3-legged OAuth 1.0a flow to obtain user access tokens for the X API using request_token, authorize, and access_token endpoints.
export const Button = ({href, children}) => {
return ;
};
### Obtaining access tokens using 3-legged OAuth flow
To perform actions on behalf of another user, you'll need to obtain their access tokens. Access tokens specify the X account the request is made on behalf of, so for you to obtain these they will need to first grant you access. These tokens do not expire but can be revoked by the user at any time.
X allows you to obtain user access tokens through the 3-legged OAuth flow, which allows your application to obtain an **access token** and access token secret by redirecting a user to X and having them authorize your application. This flow is almost identical to the flow described in [implementing Log in with X](/resources/fundamentals/authentication/guides/log-in-with-x), with two exceptions:
* The [GET oauth/authorize](/resources/fundamentals/authentication/api-reference#get-oauth-authorize) endpoint is used instead of [GET oauth/authenticate](/resources/fundamentals/authentication/api-reference#get-oauth-authenticate).
* The user will **always** be prompted to authorize access to your application, even if access was previously granted.
Before you get started, you will need to check your [application's](/resources/fundamentals/developer-apps) permissions and know the consumer keys and callback URL. If you don't have a callback URL or publicly accessible UI, consider using [PIN-based authorization](/resources/fundamentals/authentication/oauth-1-0a/pin-based-oauth), which is intended for applications that cannot access or embed a web browser in order to redirect the user after authorization.
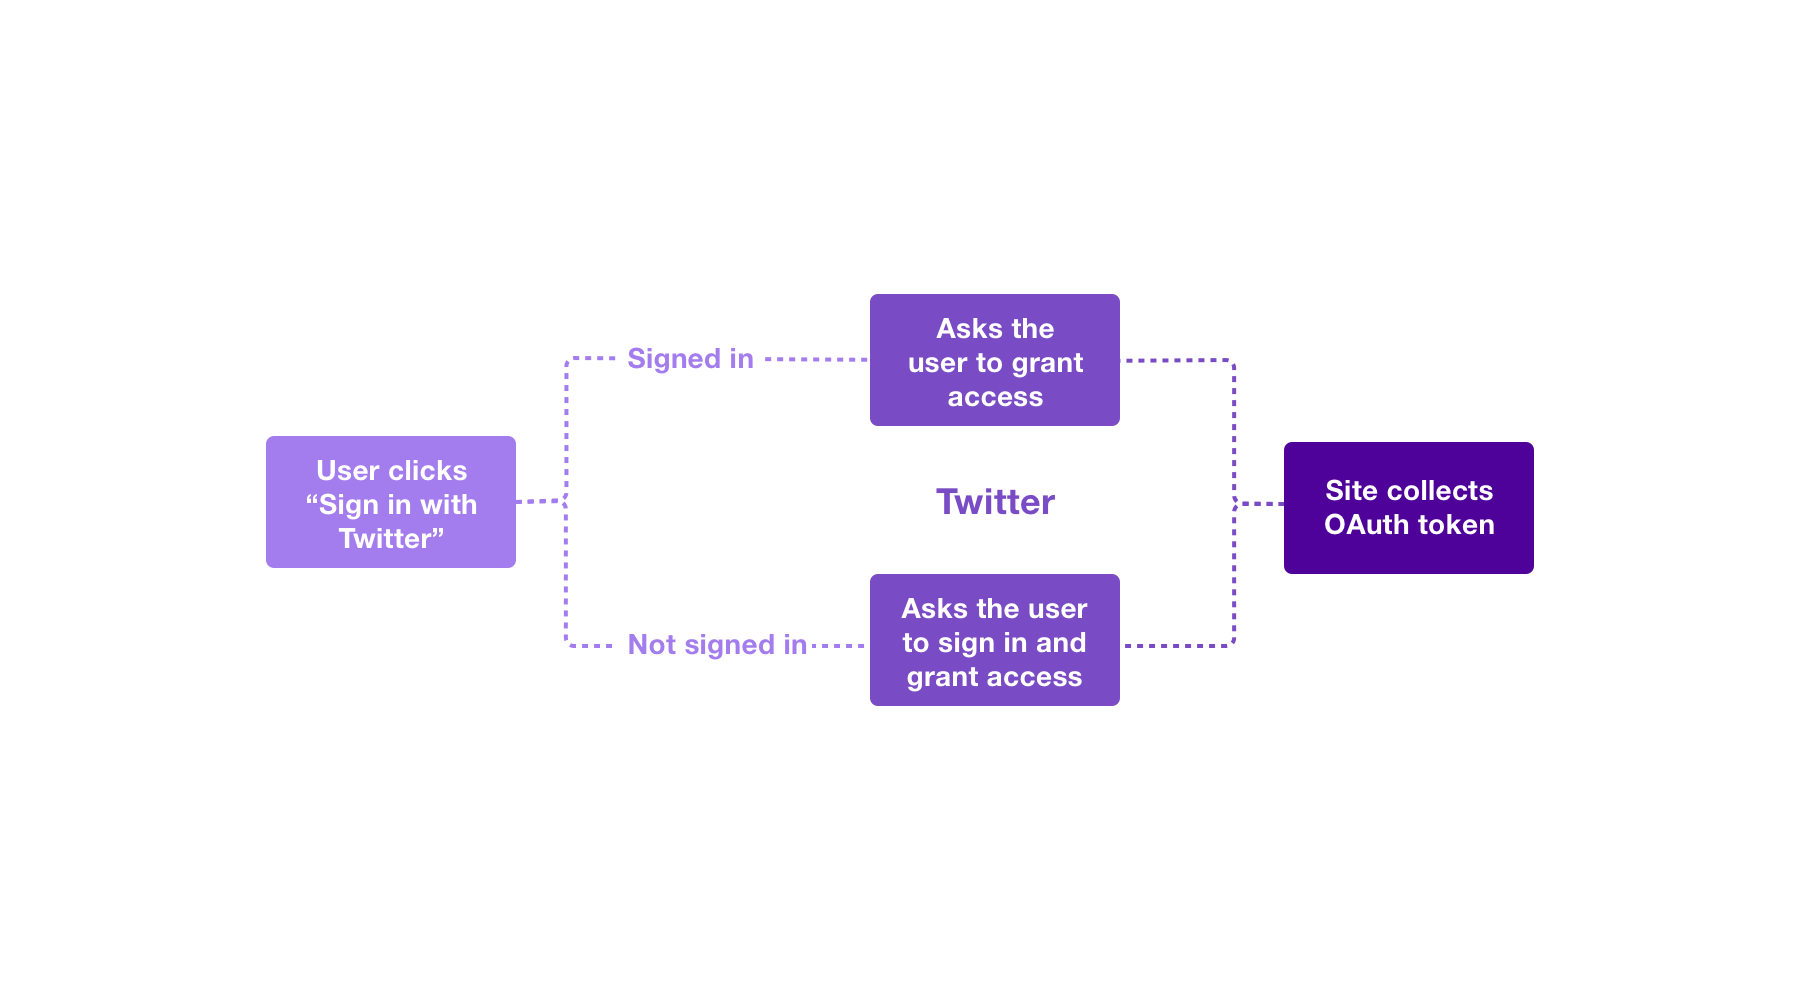
The possible states for the 3-legged sign in interaction are illustrated in the following flowchart:
#### Overview of the process
At a high level, the 3-Legged OAuth process will:
1. Create a request for a consumer application to obtain a request token.
2. Have the user authenticate, and send the consumer application a request token.
3. Convert the request token into a usable user access token.
**Terminology clarification**
In the guide below, you may see different terms referring to the same thing.
**Client credentials:**
* App Key === API Key === Consumer API Key === Consumer Key === Customer Key === `oauth_consumer_key`
* App Key Secret === API Secret Key === Consumer Secret === Consumer Key === Customer Key === `oauth_consumer_secret`
* Callback URL === `oauth_callback`
**Temporary credentials:**
* Request Token === `oauth_token`
* Request Token Secret === `oauth_token_secret`
* oauth\_verifier
**Token credentials:**
* Access token === Token === resulting `oauth_token`
* Access token secret === Token Secret === resulting `oauth_token_secret`
#### Walkthrough steps
**Step 1: [POST oauth/request\_token](/resources/fundamentals/authentication/api-reference#post-oauth-request-token)**
Create a request for a consumer application to obtain a request token.
The only unique parameter in this request is oauth\_callback, which must be a [URL encoded](/resources/fundamentals/authentication/oauth-1-0a/percent-encoding-parameters) version of the URL you wish your user to be redirected to when they complete step 2. The remaining parameters are added by the OAuth signing process.
Please note - any callback URL that you use with the [POST oauth/request\_token](/resources/fundamentals/authentication/api-reference#post-oauth-request-token) endpoint will have to be configured within your [developer App's](/resources/fundamentals/developer-apps) settings in the app details page of Developer Console.
**Request includes:**
`oauth_callback="https%3A%2F%2FyourCallbackUrl.com"`
`oauth_consumer_key="cChZNFj6T5R0TigYB9yd1w" `
Your app should examine the HTTP status of the response. Any value other than 200 indicates a failure. The body of the response will contain the `oauth_token`, `oauth_token_secret`, and `oauth_callback_confirmed` parameters. Your app should verify that `oauth_callback_confirmed` is true and store the other two values for the next steps.
**Response includes**
`oauth_token=NPcudxy0yU5T3tBzho7iCotZ3cnetKwcTIRlX0iwRl0`
`oauth_token_secret=veNRnAWe6inFuo8o2u8SLLZLjolYDmDP7SzL0YfYI`
`oauth_callback_confirmed=true`
**Step 2: [GET oauth/authorize](/resources/fundamentals/authentication/api-reference#get-oauth-authorize)**
Have the user authenticate, and send the consumer application a request token.
**Example URL to redirect user to:**
`https://api.x.com/oauth/authorize?oauth_token=NPcudxy0yU5T3tBzho7iCotZ3cnetKwcTIRlX0iwRl0`
Upon successful authentication, your `callback_url` would receive a request containing the `oauth_token` and `oauth_verifier` parameters. Your application should verify that the token matches the request token received in step 1.
**Request from client’s redirect:**
`https://yourCallbackUrl.com?oauth_token=NPcudxy0yU5T3tBzho7iCotZ3cnetKwcTIRlX0iwRl0&oauth_verifier=uw7NjWHT6OJ1MpJOXsHfNxoAhPKpgI8BlYDhxEjIBY`
**Step 3: [POST oauth/access\_token](/resources/fundamentals/authentication/api-reference#post-oauth-access-token)**
Convert the request token into a usable access token.
To render the request token into a usable access token, your application must make a request to the [POST oauth/access\_token](/resources/fundamentals/authentication/api-reference#post-oauth-access-token) endpoint, containing the `oauth_verifier` value obtained in step 2. The request token is also passed in the `oauth_token` portion of the header, but this will have been added by the signing process.
**Request includes:**
`POST /oauth/access_token`
`oauth_consumer_key=cChZNFj6T5R0TigYB9yd1w`
`oauth_token=NPcudxy0yU5T3tBzho7iCotZ3cnetKwcTIRlX0iwRl0`
`oauth_verifier=uw7NjWHT6OJ1MpJOXsHfNxoAhPKpgI8BlYDhxEjIBY`
A successful response contains the `oauth_token`, `oauth_token_secret` parameters. The token and token secret should be stored and used for future authenticated requests to the X API. To determine the identity of the user, use [GET account/verify\_credentials](/resources/fundamentals/authentication/api-reference).
**Response includes:**
`oauth_token=7588892-kagSNqWge8gB1WwE3plnFsJHAZVfxWD7Vb57p0b4`
`oauth_token_secret=PbKfYqSryyeKDWz4ebtY3o5ogNLG11WJuZBc9fQrQo`
**Using these credentials for OAuth 1.0a (application-user) required requests**
Now you've obtained the user access tokens; you can use them to access certain APIs such as [POST statuses/update](/x-api/posts/manage-tweets/introduction) to create Tweets on the users' behalf.
**Request includes:**
`POST statuses/update.json`
`oauth_consumer_key=cChZNFj6T5R0TigYB9yd1w`
`oauth_token=7588892-kagSNqWge8gB1WwE3plnFsJHAZVfxWD7Vb57p0b4`
#### Sample use case
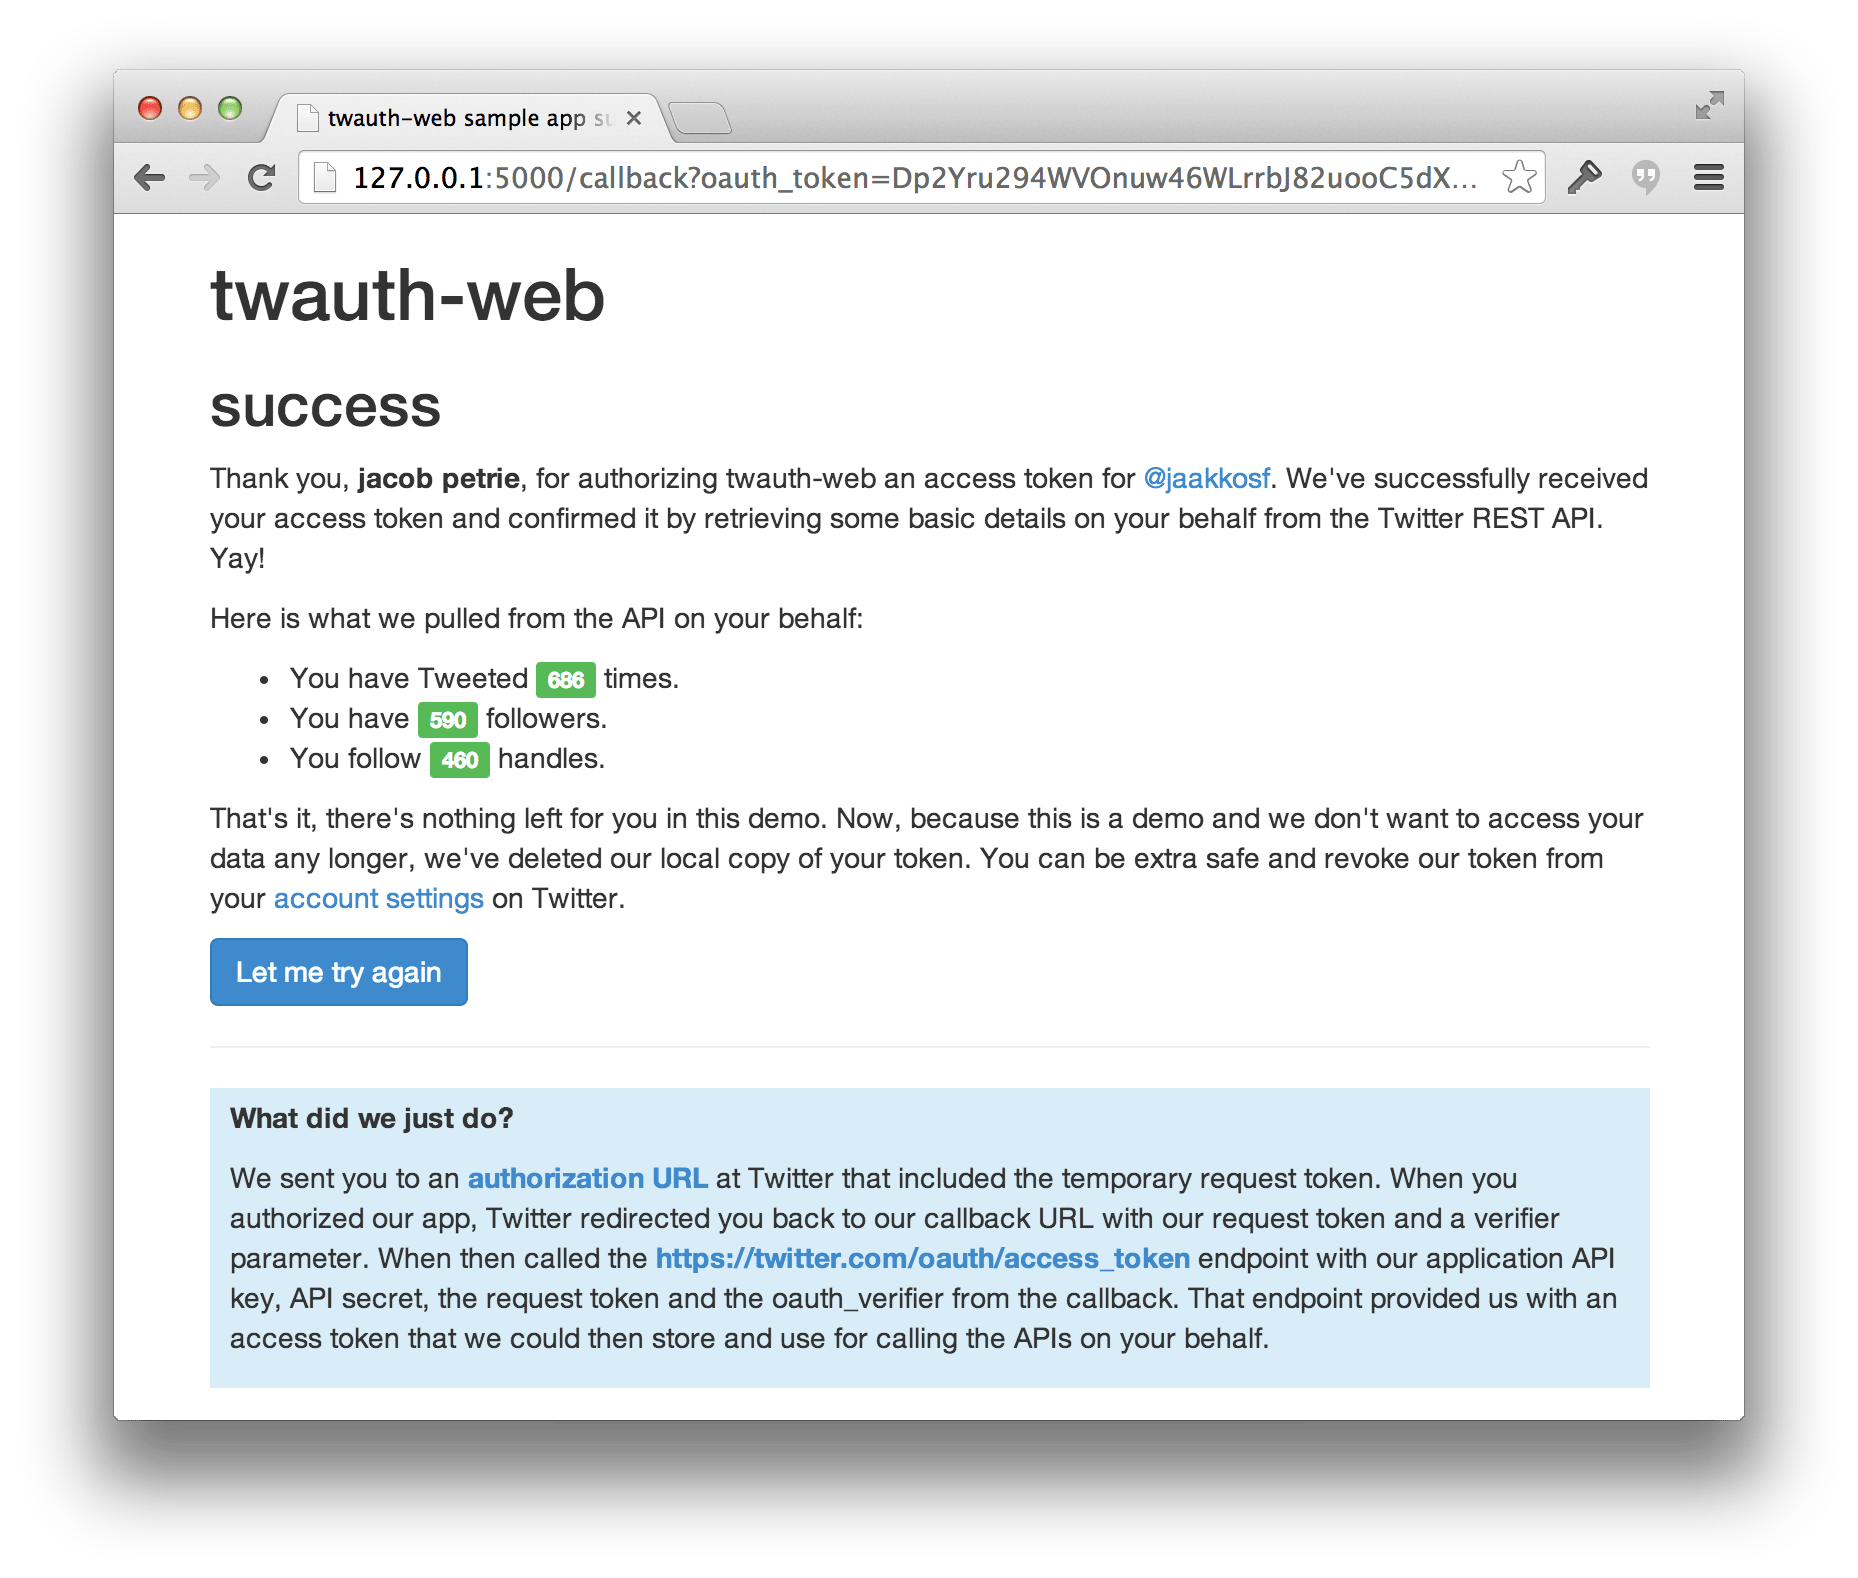
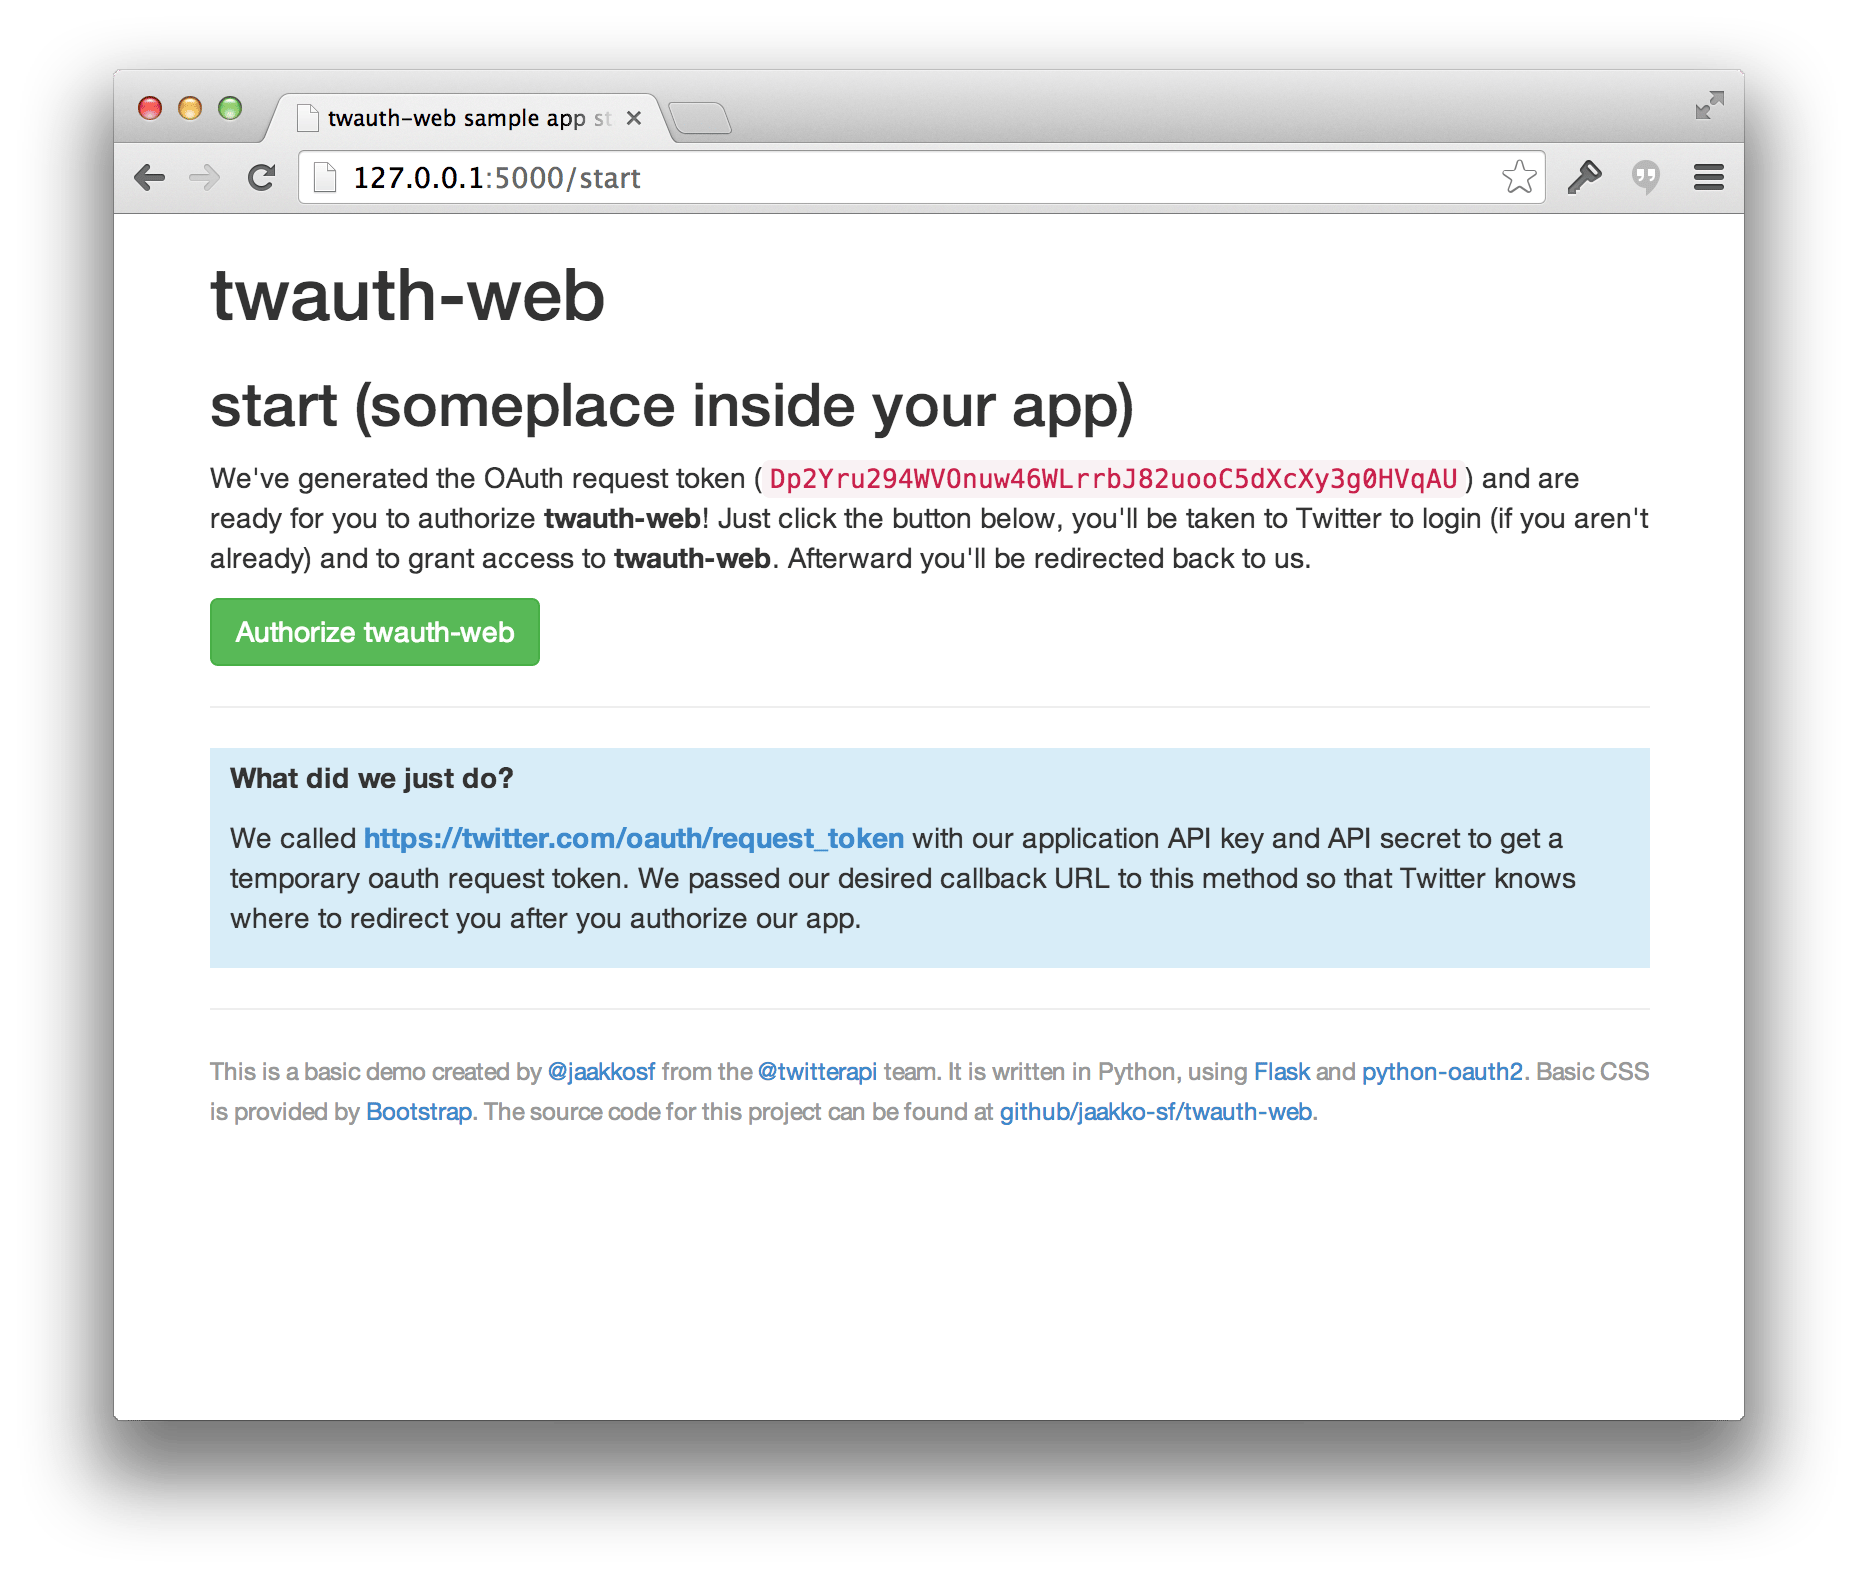
The standard flow is web-based and uses the 3-legged authorization OAuth flow. The screenshots outlined here are part of a sample that you can view the source of at [https://github.com/xdevplatform/twauth-web](https://github.com/xdevplatform/twauth-web).
At some point in your application, you will want to redirect to X in order to authorize your application.
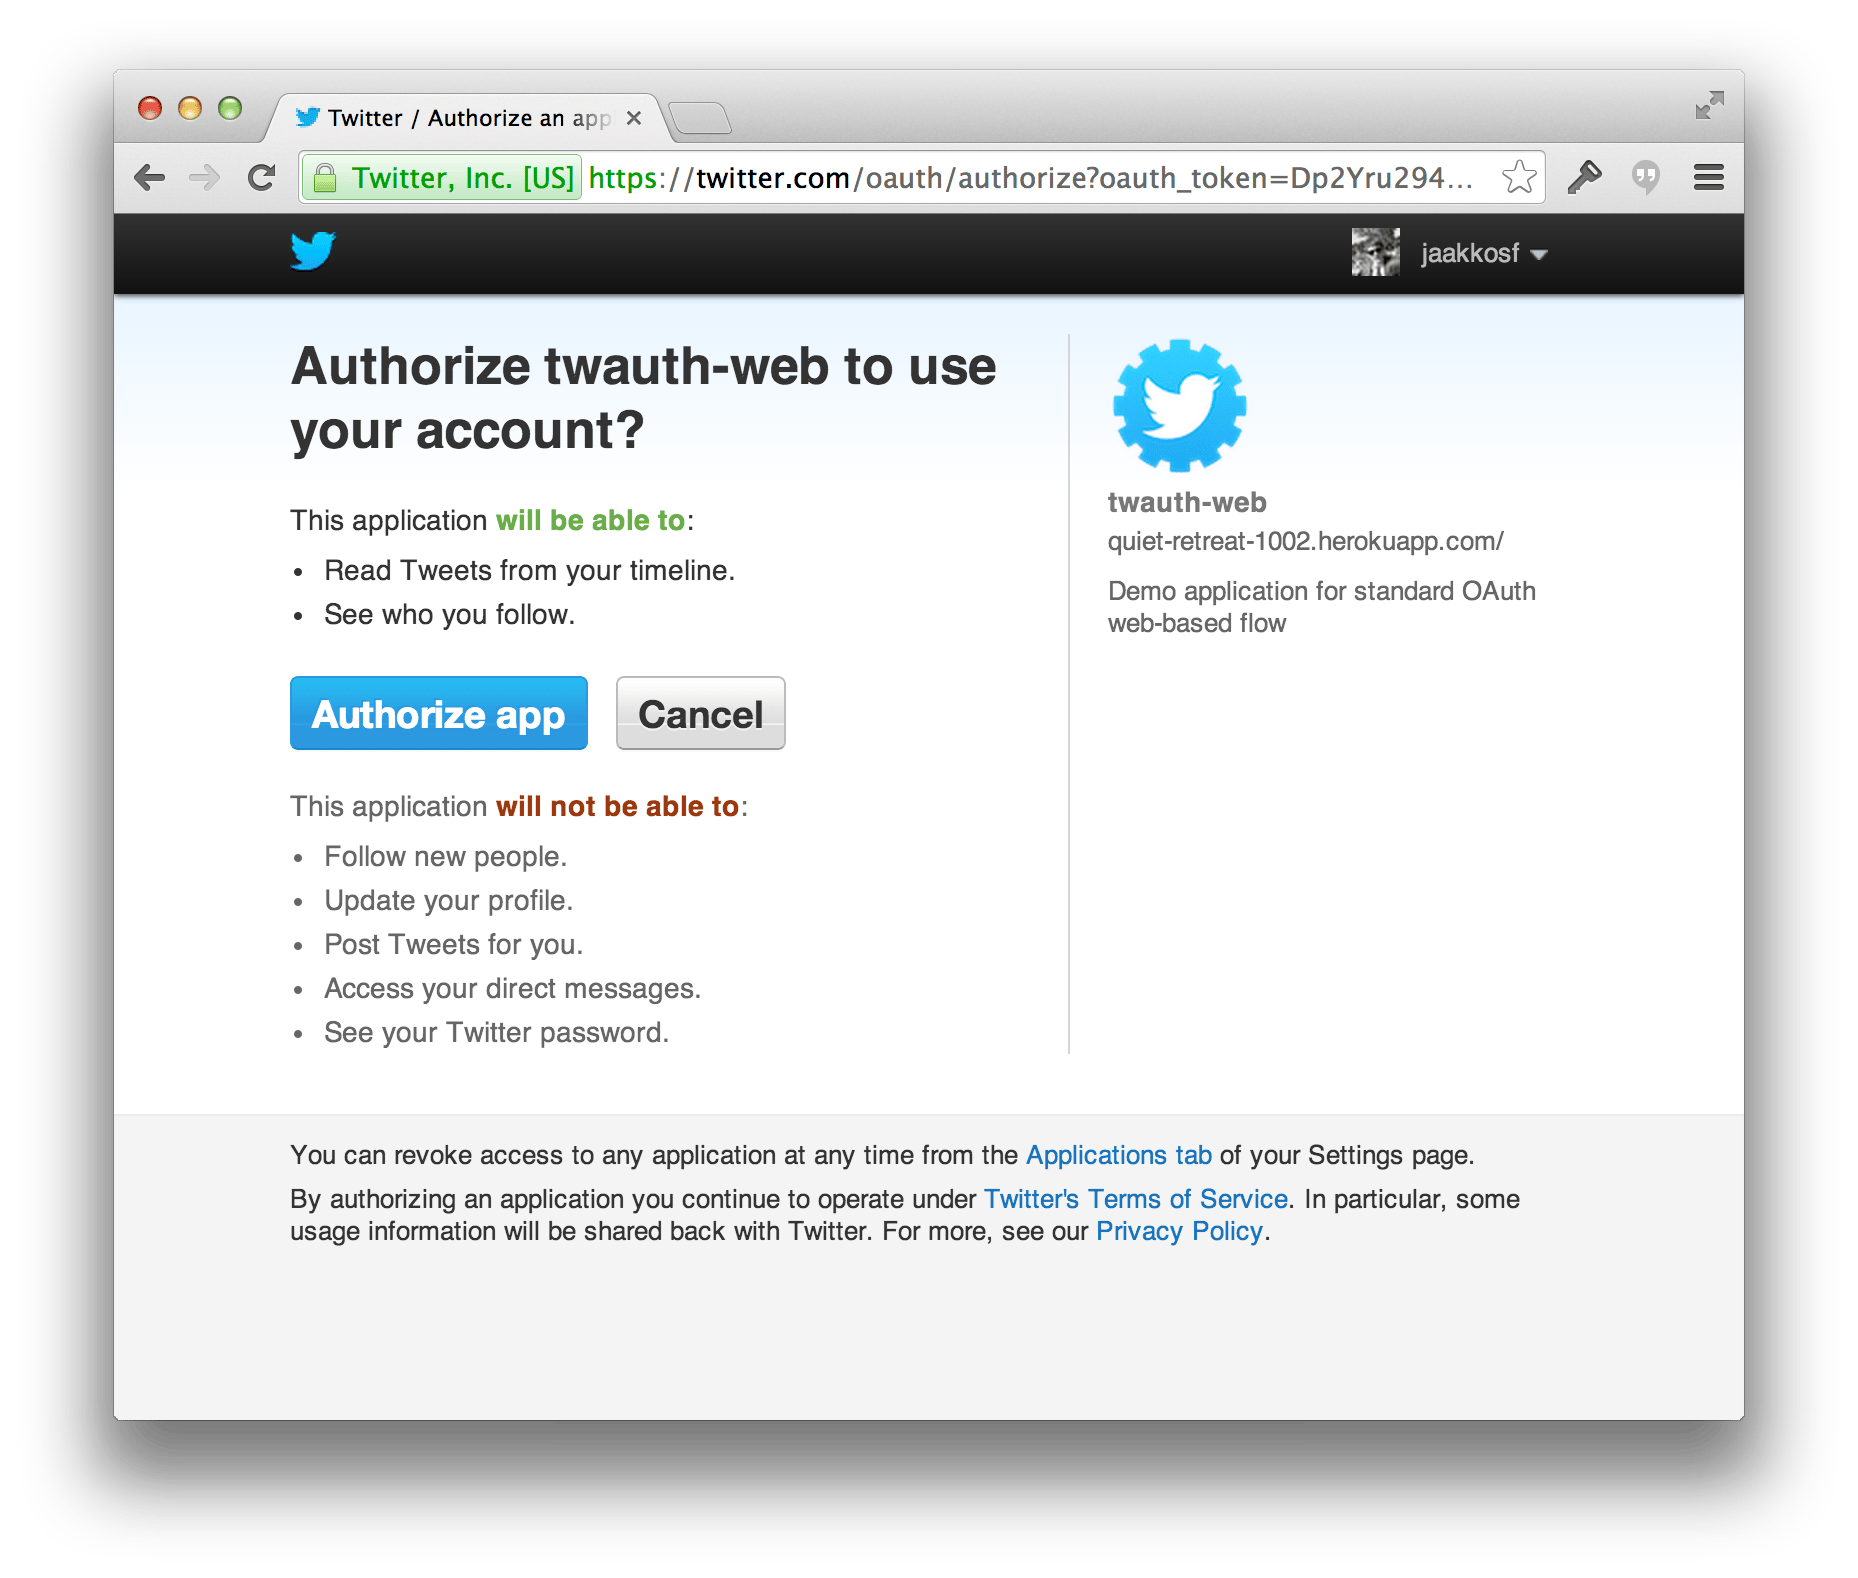
 When you redirect to X with the request token, the user will be prompted to authorize your application.
 Upon authorizing your application, the user will be redirected to the callback URL provided when you generated the request token. You will use this to obtain the permanent access token for this user and store it locally.